Cute Ice Skate DIY Door Decor (For Christmas)!
This post may contain affiliate links. For more information, please see our disclosure policy.
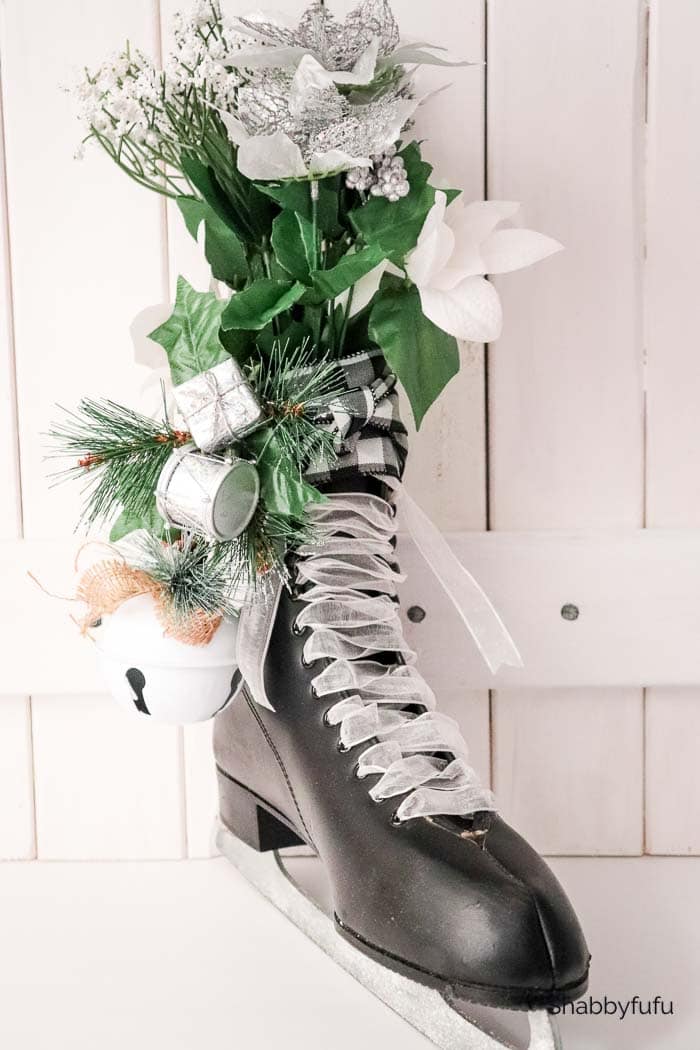
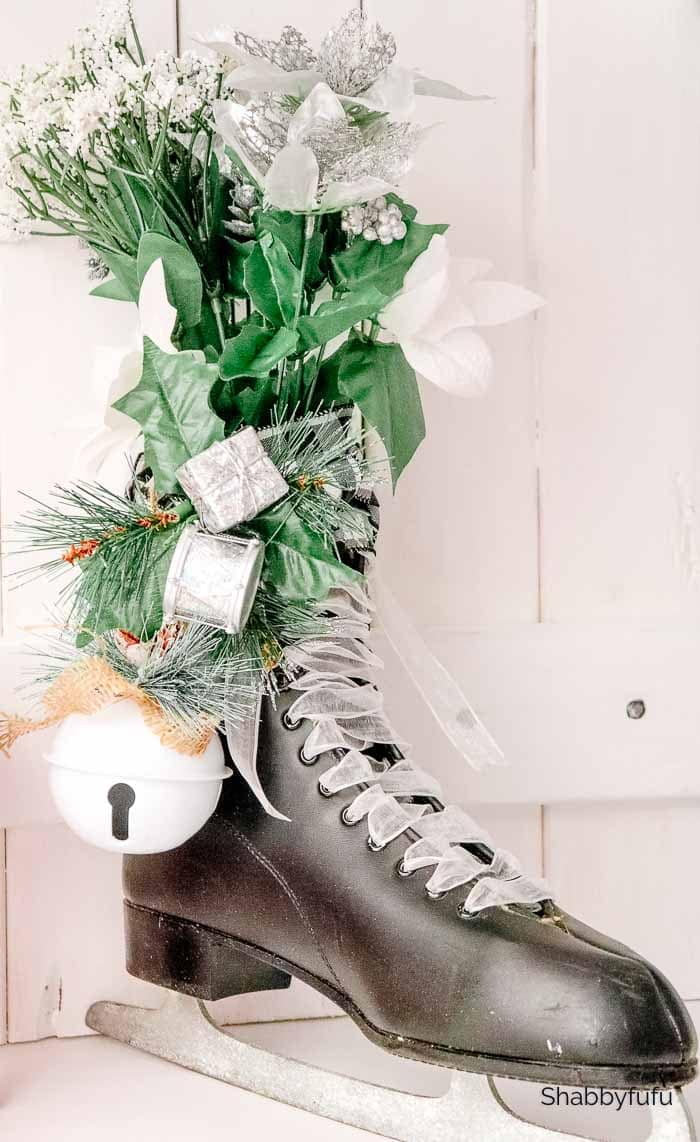
Ice Skate DIY Decor…because this year is definitely one for the record books! Why not forgo the traditional front door wreath and try an unexpected design. This ice skate upcycle project with ribbon, greenery and a pretty oversized bell might be just the whimsy you’re looking for.
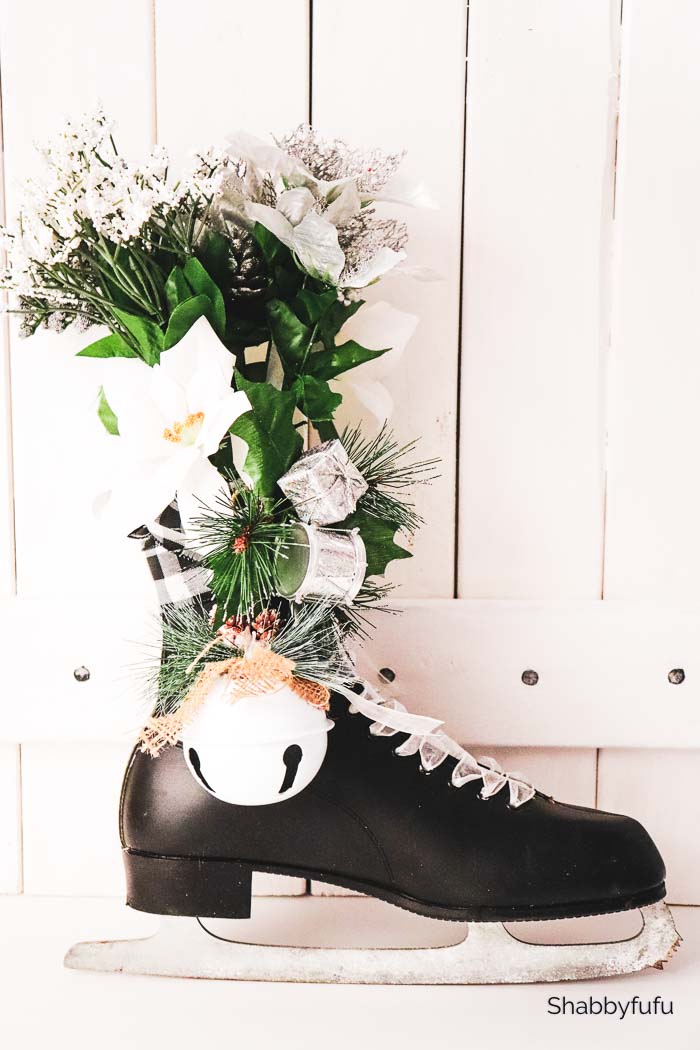
For every season I try to challenge myself and find at least one inexpensive item to repurpose. I’ve had this old ice skate in a crafting pile for years in my garage! Rather than painting it white, I thought that I’d just leave it be and dress it up as a contrast piece. I’m actually planning on giving this one to a friend as a gift and she loves the more traditional look of black with buffalo plaid, etc. Hand made gifts rock and this ice skate diy decor is so fun!
Keep reading because beneath this ice skate diy decor with instructions are 15 more crafts that you can make for the holiday season from some talented bloggers. But for now…lets get started!

Ice Skate Diy Decor
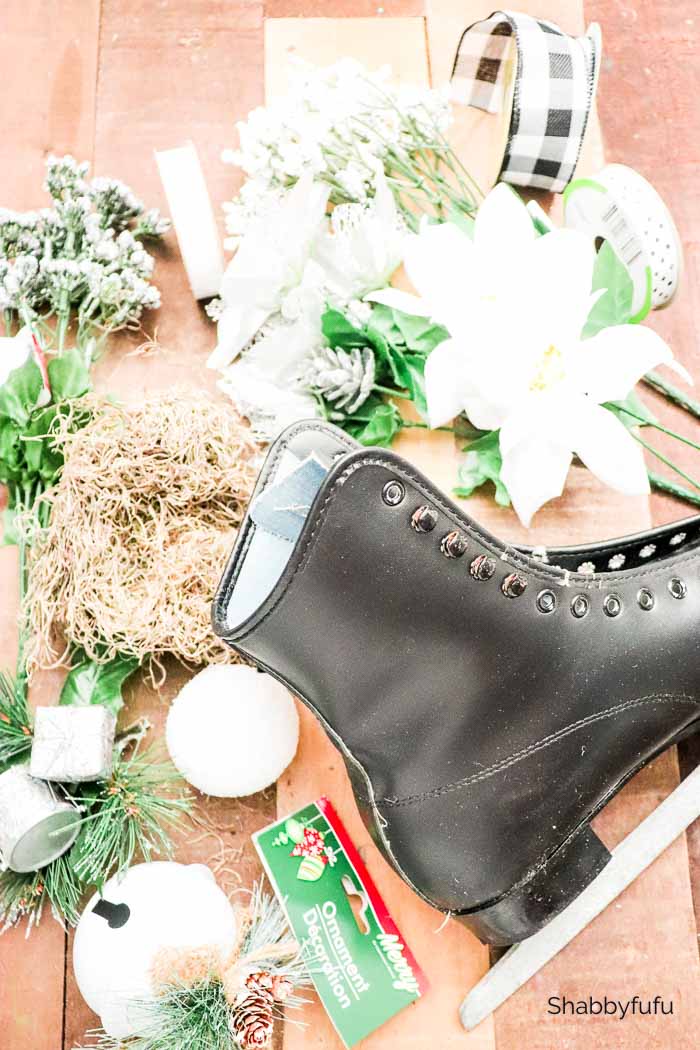
Supplies Needed:
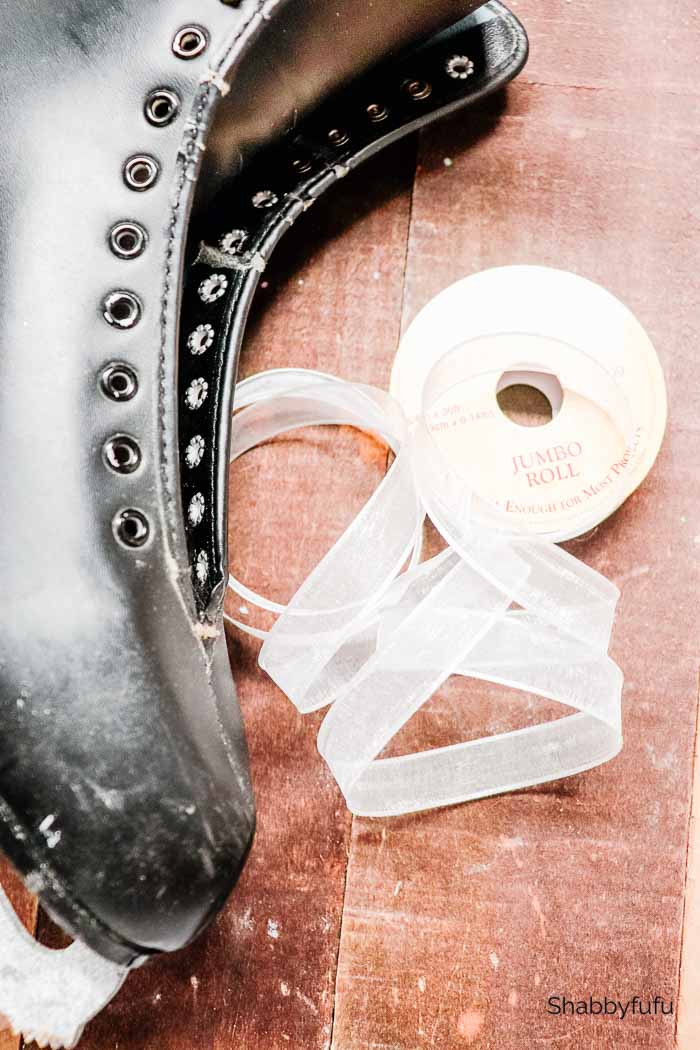
• One ice skate: *TIP* – Check your local thrift store or garage sales for inexpensive ice skates!
• A 3” Styrofoam ball
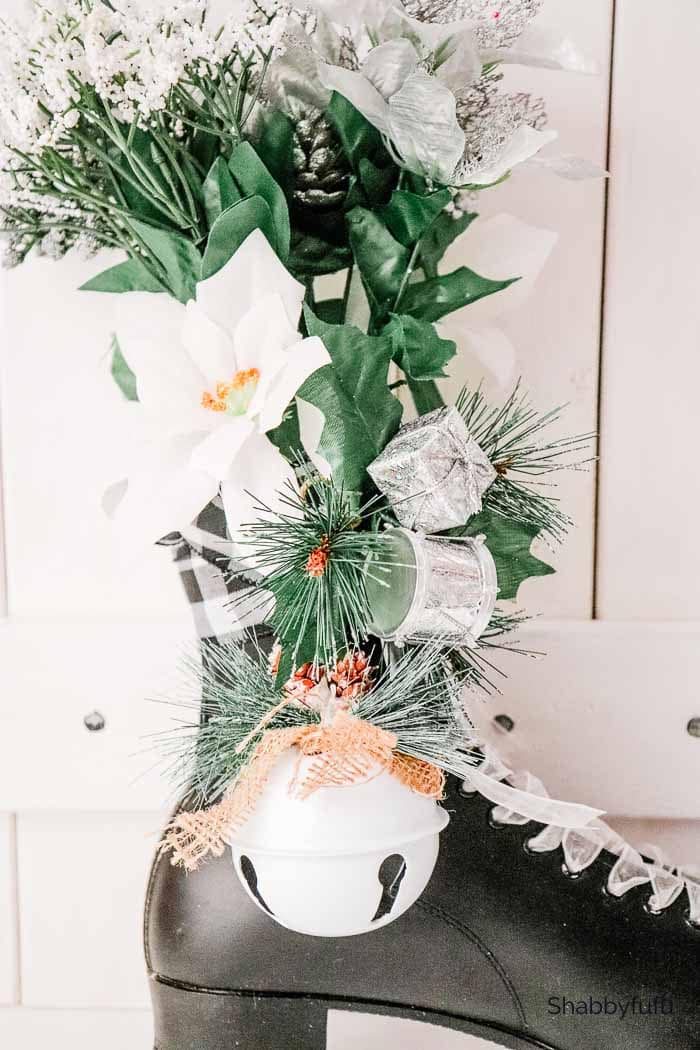
• Nice variety of winter floral sprigs, such as white pine cones, white wintery greens, gift packages, and white poinsettias. Look for these at The Dollar Tree or a craft store, or even local yard sales.
• Some packaged Spanish moss. Don’t grab it from your tree as there are often bugs!
• A large sized hanging ornament. I love this large white bell ornament from Dollar Tree!
• Variety of wired ribbon from The Dollar Tree or Hobby Lobby. This ribbon is a black and white buffalo check in 1.5 in x 30 ft, and I also used sheer white ribbon 5/8 in 30 ft.
• 2-3 plastic grocery bags (for filler).
Instructions To Make The Ice Skate Diy Decor:
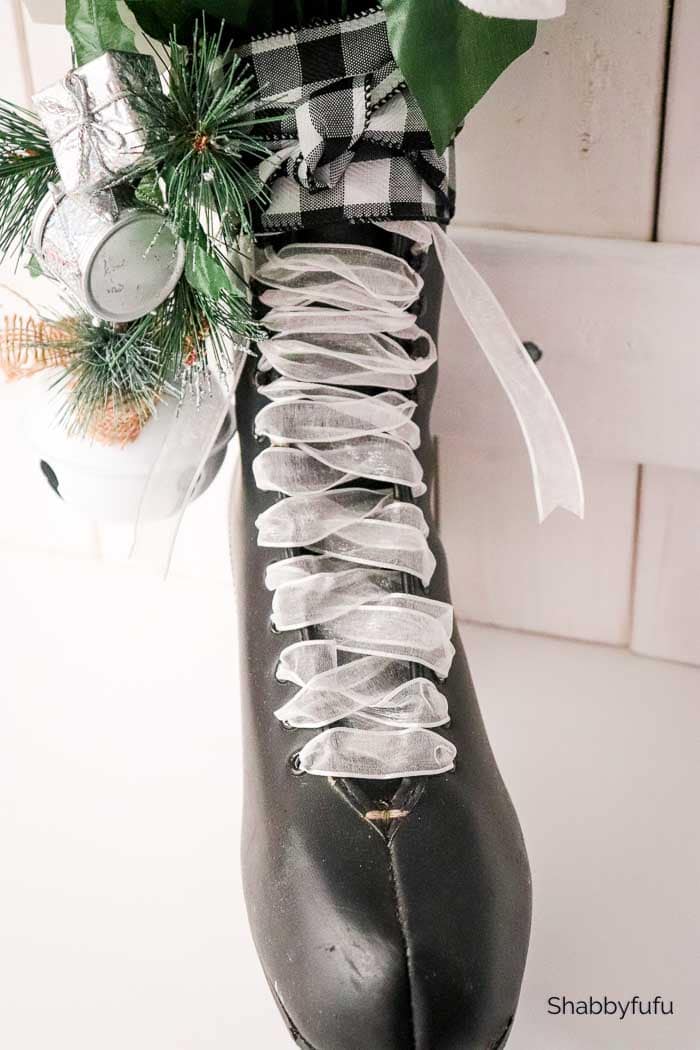
• Remove any laces that come with the ice skate.
• Fill the ice skate with 2-3 rolled up plastic grocery bags to give it some stiffer shape.
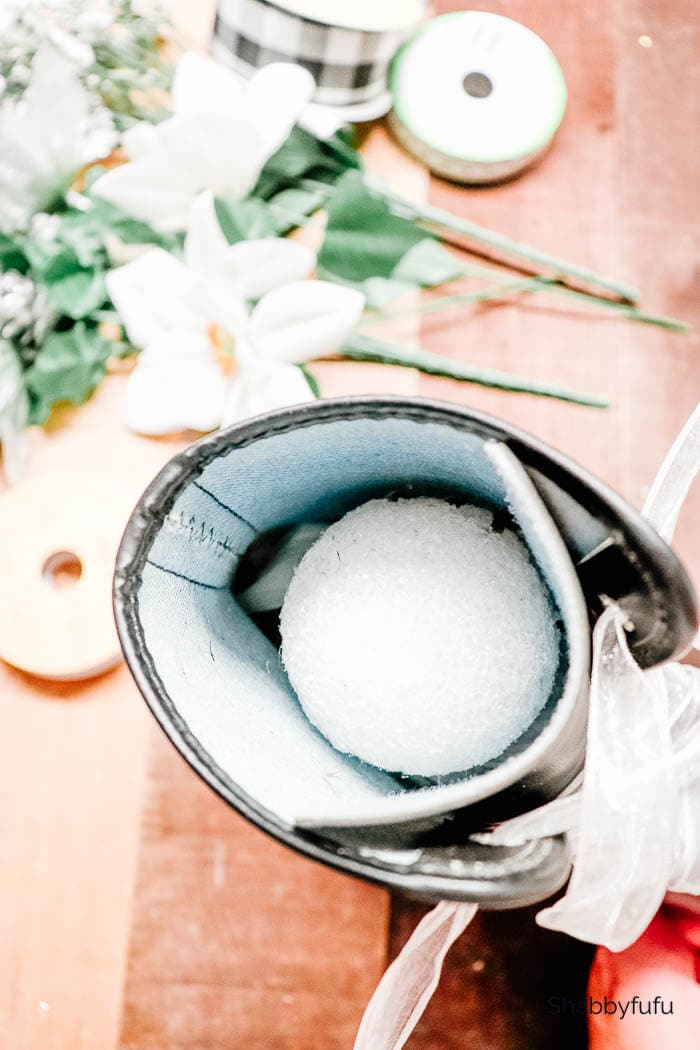
• Place the Styrofoam ball inside skate in the upper boot area.
• Cut 5 yards of the sheer white ribbon and lace the skate. Keep the ribbon laces nice and loose so they look full.
- Leave the ribbon lace ends hanging and trim the edges to create ribbon points.
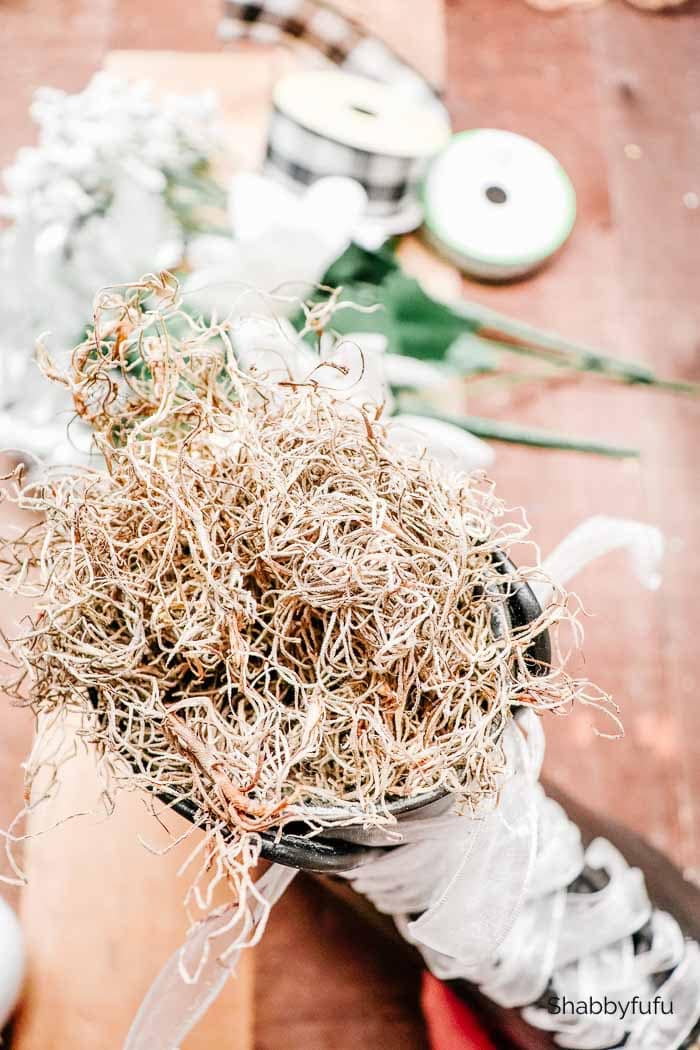
• Place some Spanish moss in the top area of the skate to fill it and insert floral sprigs securely into the Styrofoam ball.
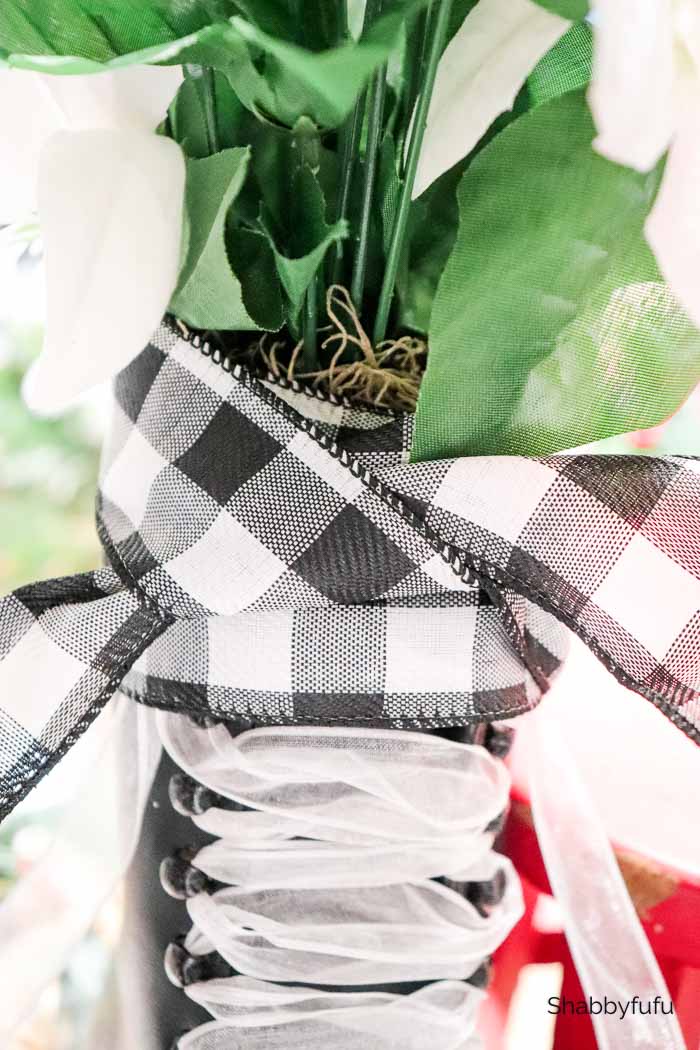
• Cut 10 yards of your buffalo check ribbon and wrap around the skate twice. Tie a bow in the front of the skate. Trim the tips of the bow to a point.
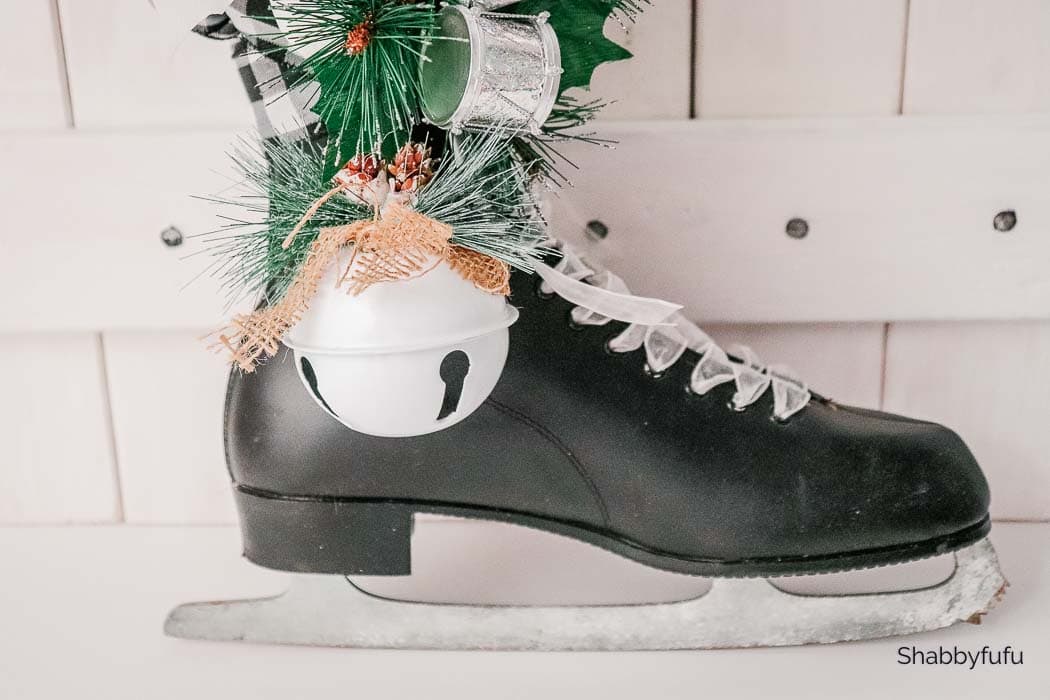
• Feed the string for your bell ornament through one of the lace holes or secure around the florals with a pice of ribbon or twine.
• Display on a mantle, hanging on an old sled, set near the fireplace, or sitting on your covered porch.
• *You can hang the skate on a door, etc by using either a length of wire formed in a loop or a doubled up piece of twine to feed through the top hole in the skate on the side that would be hanging against the door.
PIN THIS FOR LATER!

DIY ‘SANTA STOP HERE’ SIGN | GIRL JUST DIY
If you have scrap wood lying around you want to repurpose, Toni from Girl Just DIY will be your life-saver. She shows you how to flip it into a charming Christmas-themed sign for your porch using materials I’m sure you already have at home!
CHINOISERIE CHRISTMAS ORNAMENTS | ATTA GIRL SAYS
It’s no secret I love anything-and-everything chinoiserie! So, you can imagine my glee when I saw this beautiful chinoiserie DIY ornament Amy made. Check out her tips on how to make one yourself!
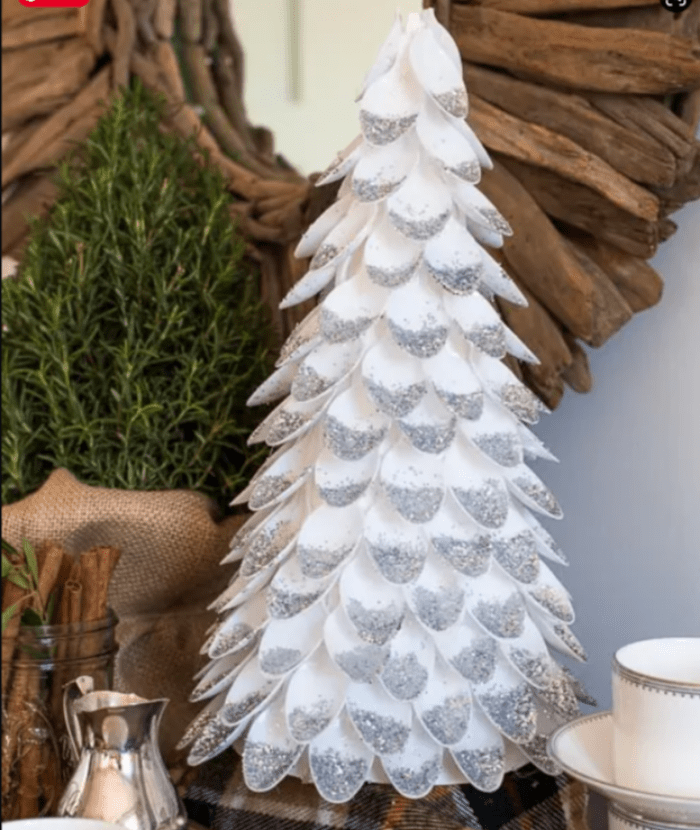
DIY CHRISTMAS TREE PLASTIC SPOON CRAFT | HEATHERED NEST
Add a creative twist to your Christmas decorations with this unique tree made by Heather. She transformed some basic plastic spoons and glitter into a decor statement maker!
CHAMPAGNE BUCKET CHRISTMAS TREE STAND | POSTCARDS FROM THE RIDGE
For those who love their vintage-inspired decor, Angie came up with a lovely Christmas tree stand. Easy and quick, this DIY project is budget-friendly and adds a sophisticated touch.
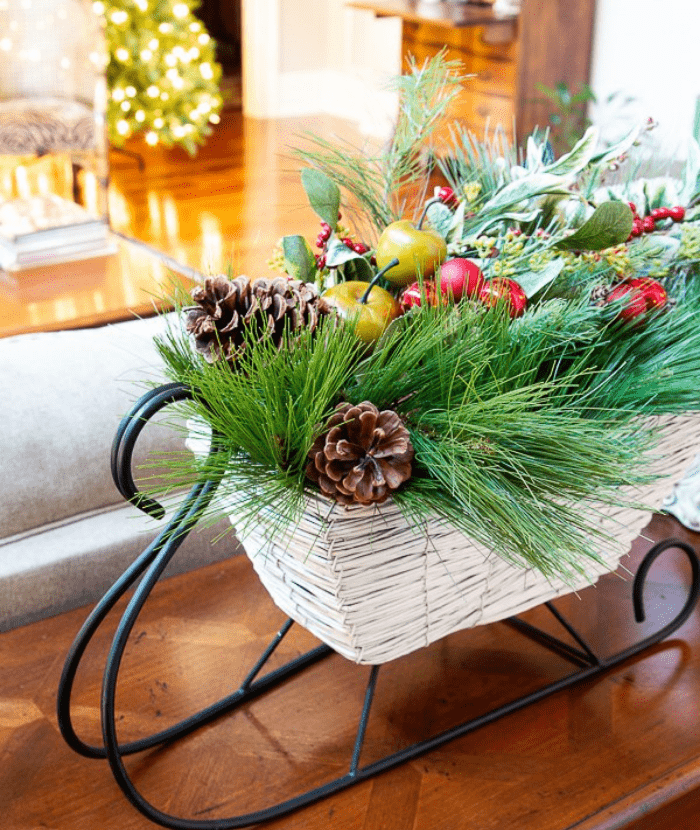
CHRISTMAS SLEIGH CENTERPIECE | OUR SOUTHERN HOME
Not feeling inspired to get into Christmas decorating? Well, this stunning centerpiece might change your mind! Brighten up your decor with a lovely centerpiece filled with greenery and give your home a chic cottage farmhouse feel.
UPCYCLED PLAID CHRISTMAS DOOR HANGER | HOUSE OF HAWTHORNES
Talk about a thrift flip! Pam shows us how she transformed an old plaid bag into a fun and stylish Christmas Door Hanger. Visit her blog, House of Hawthornes, and follow her step by step.
THE ELEGANT LITTLE TREE | SOUTHERN NELL’S GRACIOUS LIVING
Head over to your closest local thrift store and get crafty! This elegant Christmas tree has that unique retro vibe we all love. The best? Lori made it using almost all thrifted items, and she shows us her tips. You don’t want to miss out!
SIMPLE DIY CHRISTMAS SIGN | CLOCHES AND LAVENDER
Refresh this year’s Christmas decor with a simple farmhouse-style DIY sign. Using everyday supplies and Cindy’s detailed instructions, you can make this cutie in no time!
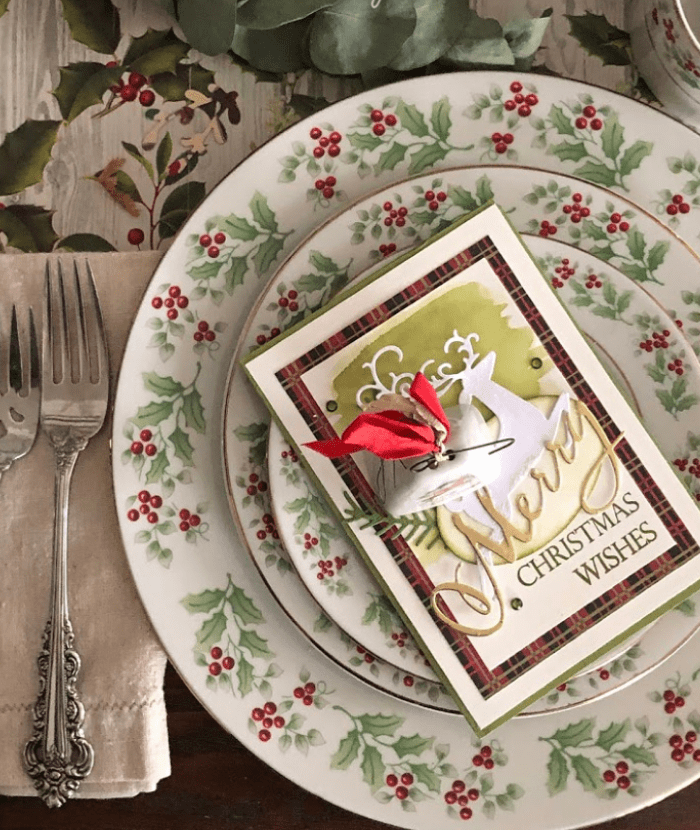
VINTAGE THRIFTED CHRISTMAS TABLESCAPE | MEEGAN MAKES
Vintage heirlooms meet chic thrifted finds in this picture-perfect Christmas tablescape!
BUDGET-FRIENDLY WINE GLASS CHRISTMAS TREES | A CRAFTY MIX
Add some sparkles to your festivities with these dashing wine glass trees! Michelle from A Crafty Mix has a brilliant step by step tutorial that’s super easy to follow along, and the result is not just adorable but super affordable! Don’t miss it!
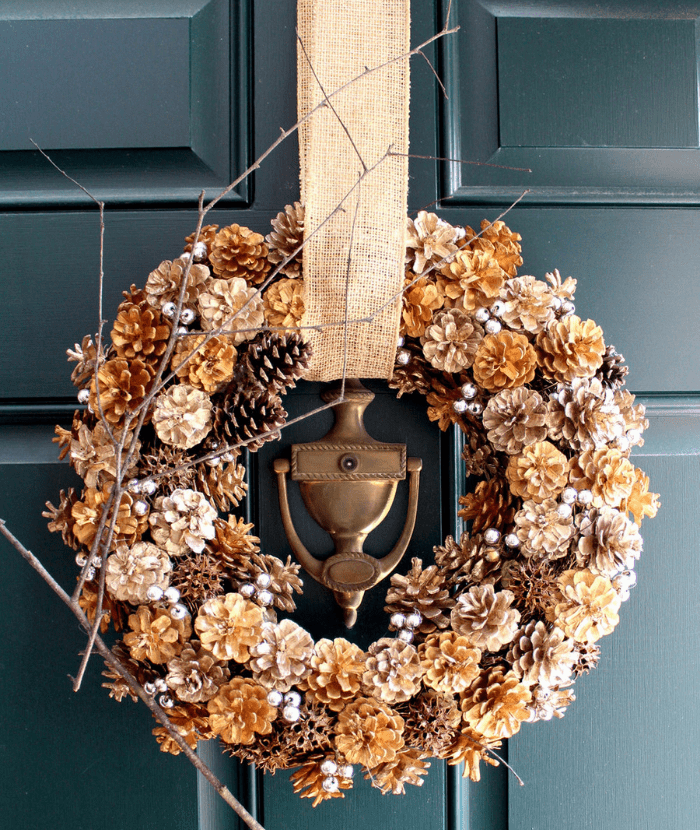
DIY FALL WREATH | TAG & TIBBY
Julia Fain made magic, transforming an old thrifted wreath into a stunning new one in this easy DIY.
Using natural elements like branches and small pinecones, she’s sharing all her secrets in this post.
BEAUTIFUL CHRISTMAS CENTERPIECE | LOVELY ETC
Metallics are a holiday decor staple and can make any room look extra festive. In this DIY, Carrie gives a fresh take on it with this sparkly Christmas centerpiece!
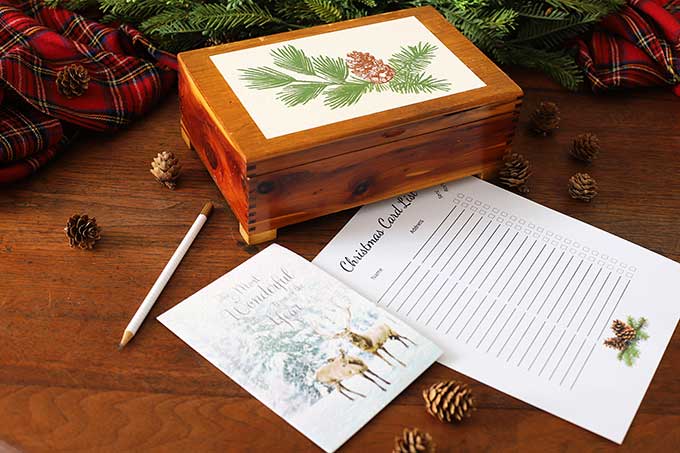
UPCYCLED CEDAR BOX | HOUSE OF HAWTHORNES
Take advantage of thrift store finds just like Pam did on this DIY project! She managed to revamp an old cedar box into a charming Christmas card organizer.
VINTAGE CHAIR CHRISTMAS DECOR | OH MY CREATIVE
Cute and incredibly easy to do; this DIY project is perfect for bringing new life to an old piece of furniture. It’s a great add on to a traditional decor style!

DIY GLITTER CANDLE HOLDER | EXQUISITELY UNREMARKABLE
From dull to magically enchanting, this DIY project will be a total breeze.
Put your DIY skills to good use and follow along with Kim’s advice to make these adorable candle holders.

This is a great idea and I have a pair of skates……..now I have to find them !