Woodland Faux Rose Petal Cake Tutorial Project
This post may contain affiliate links. For more information, please see our disclosure policy.
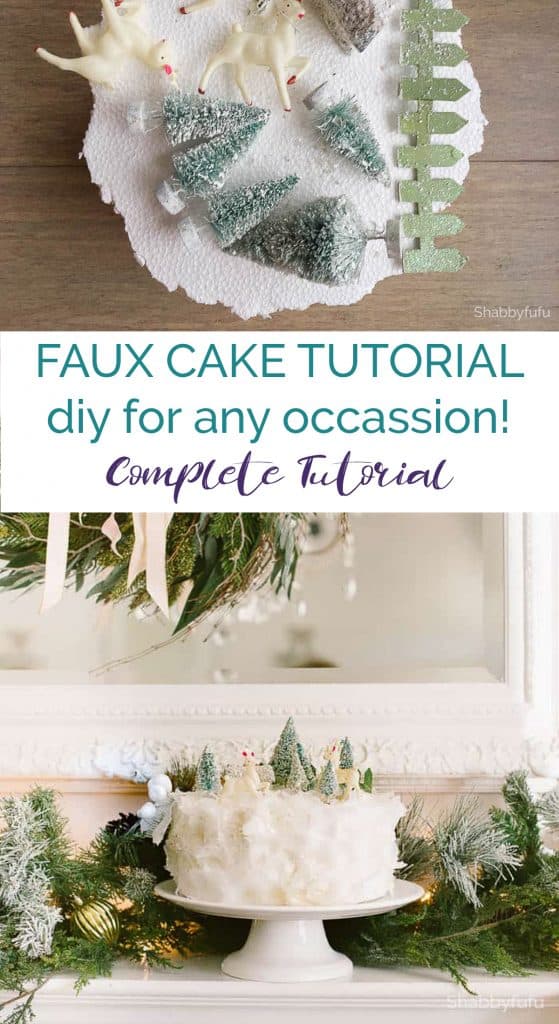
Faux cake tutorial is today’s post. Create a faux woodland cake for any occasion like this one! Although it does take a bit of time to put together, it’s a beginning level project that anyone can easily do. I used to create these and sell them in my shop at Shabbyfufu and I hope that you’re inspired to create something similar!

Rose petal cakes are not something that you see every day, in fact I don’t know if I’ve ever seen them before…but I made many back in the day! The one that I’ve show here today is obviously for Christmas…
You can create yours for a wedding with a wedding cake topper added or in pink for Valentine’s Day or just leave it plain and display on a cake stand.

Above is one that I sold in my shop years ago, and today’s faux cake tutorial project is similar.
Faux Cake Tutorial
- Cake Dummy – 8″ Round by 4″ Tall (or similar)
- White Silk Rose Petals (or color of your choice)
- Mica Flakes
- Miniature Flocked Christmas Trees
- Small Vintage Plastic Reindeer
- Hot Glue, Spray Adhesive and other miscellaneous small embellishments.

Here is what I started with and I should tell you that I’ve collected miniature and small bits for crafting for a number of years. You can generally find similar items on Etsy, Amazon and craft stores and I have linked some above. For this faux cake tutorial I didn’t have a small enough cake form. I took a block of 4″ styrofoam, traced a circle (from a pot lid) and cut with a serrated bread knife. I would recommend buying the cake form…it’s a lot easier ;-))

My hand cut “cake” was rough, but it doesn’t matter because I would be covering with the silk rose petals.

Decorating it – faux cake tutorial
Start at the bottom and just start hot gluing around the cake from one end to the other in a circle. Then keep going around the cake adding more petals until the entire outside of the cake is covered. Be generous with the silk petals and don’t leave gaps for the styrofoam to show through.

Once you’ve covered the outside glue petals on the top as shown until no more of the styrofoam shows. You could just leave it like this and it’s pretty as it is…don’t you think?

Important TIP
As you hot glue, please be careful and if you have a glue gun with two temps I’d recommend using the low setting. The heat will melt the foam, so the lower temperature should be better. Press the petals to give some dimension and of course…be careful not to burn your fingers! I always keep a towel (rag) to use between my fingers and the project close by and a bowl of ice water will help if you do get a drop of that hot stuff on your skin.

Embellishing
Next it’s time to play if you’re following this faux cake tutorial and making one! The rose petal gluing can be a bit tedious, but creating your vignette on the top is the fun part. I just worked with what I had and glued some small bottlebrush trees covered in mica, vintage white deer, a small cardboard putz house, cardboard fencing, and a vintage Christmas flower on the side for depth. Since the deer had tiny feet I made sure to glue a couple of rose petals around them to anchor them. Just be sure everything is securely glued down before the next (and final) step.
Take some spray adhesive (buy in a can at the craft store) and lightly spritz any areas that you’ll want to add your mica flakes to. Put a small amount of mica flakes in your hand and sprinkle on the areas that you’ve sprayed. I love mica glitter flakes but you can also use German glass glitter (see my tutorial for MAKING YOUR OWN GLITTER or craft store glitter.

PIN THIS IDEA FOR LATER!
That is so pretty Janet! Wow – I love all the texture. No wonder you sold so many! 🙂 Thanks for the easy instructions, and Happy Monday!
Super fun project to try and would cute with all of your teacups!
I want to make one NOW. It is beautiful and of course, I have to do a Christmas theme!! Thank You So Much!
These are the most unique and beautiful pieces for the holidays and I’d love to see how yours turns out Barbara!