Chinoiserie Pumpkins DIY – The Easy Way
This post may contain affiliate links. For more information, please see our disclosure policy.
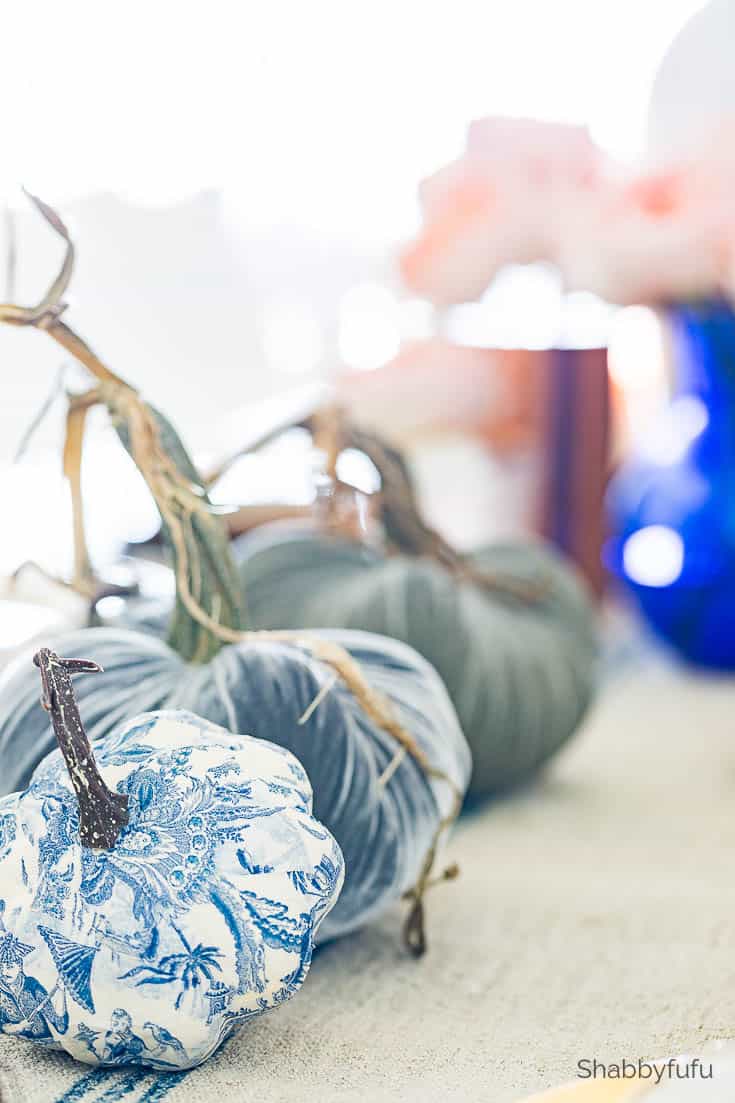
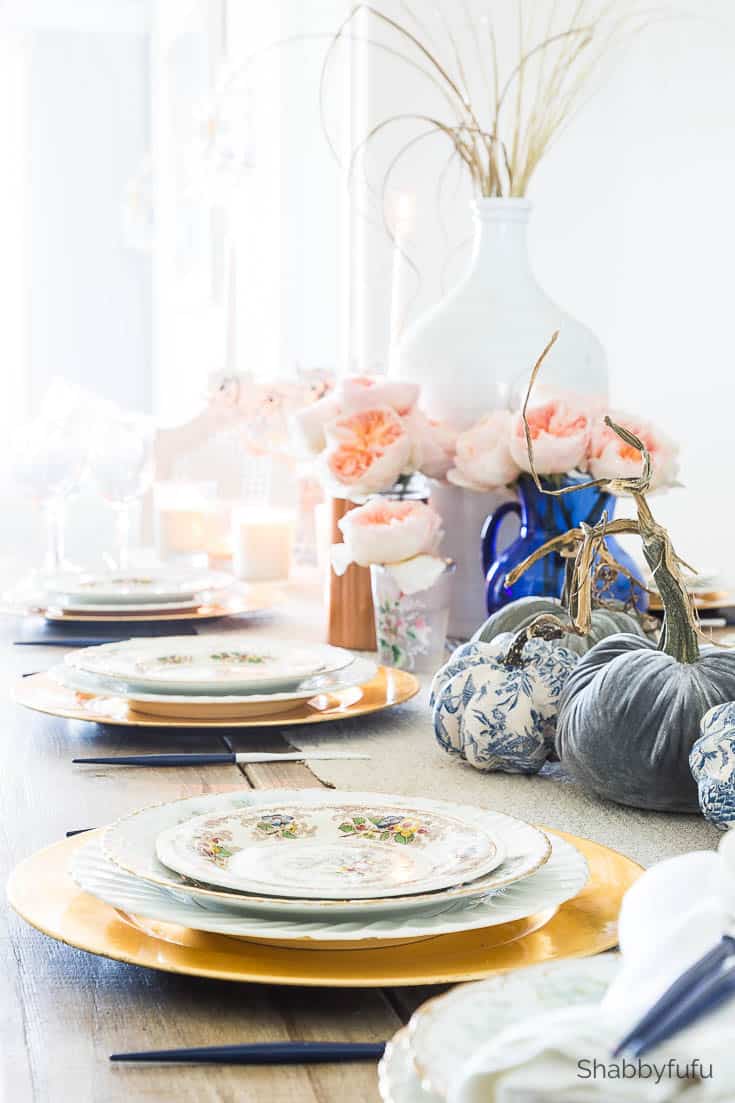
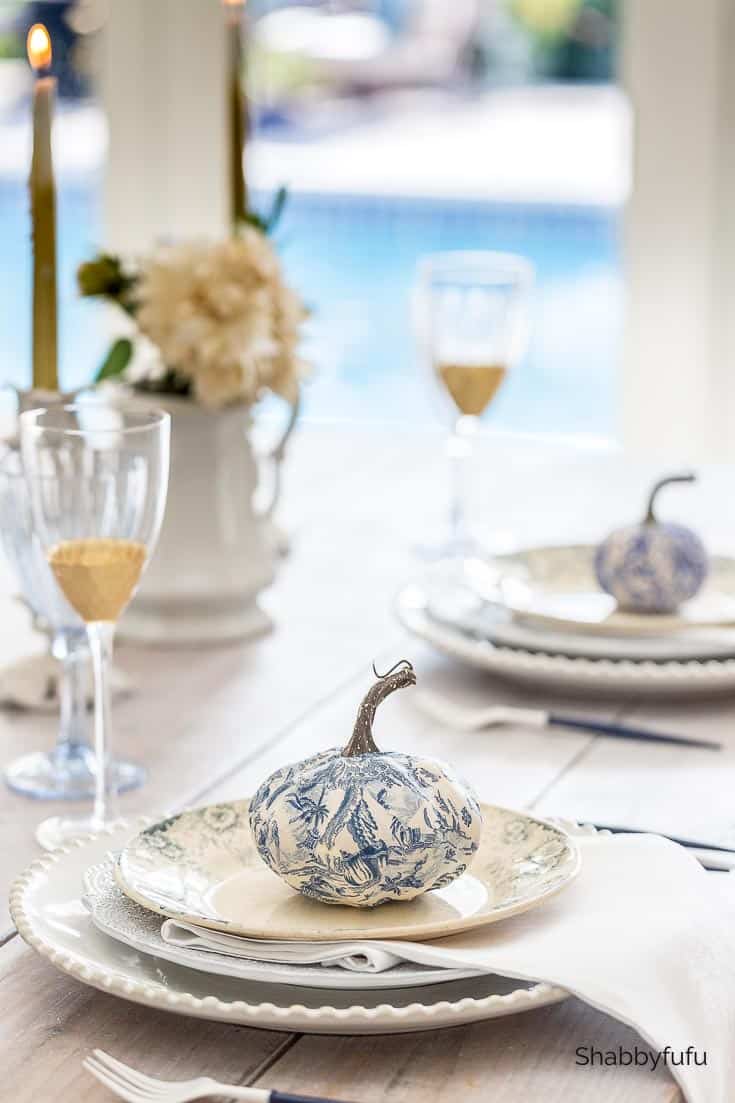
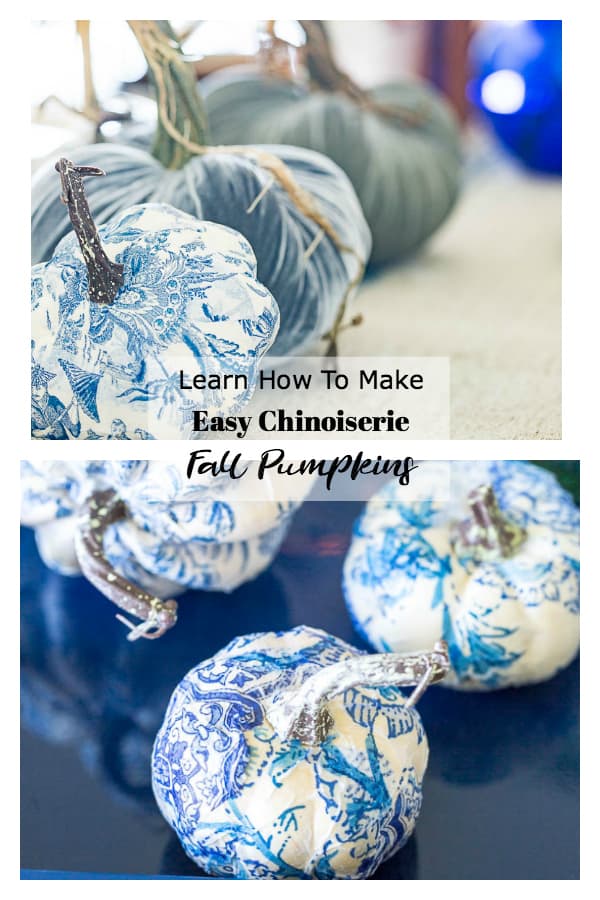
Chinoiserie pumpkins DIY the easy way, because who doesn’t want to create some beautiful without spending oodles of time (or money)! If you love design as I do, you may have noticed that deep blue is hot once in decor and Chinoiserie ginger jars are everywhere. I’ve had a long time love affair with blue in my homes and yet not so much the traditional colors of fall. Dare to be different and do your own thing is how things roll in our family. See that little Chinoiserie pumpkin in my table setting below? I’m going to share how to make your own and truly no skills are required.
You will need a few supplies, as in any craft project. They are not costly and some you’ll likely already have. I figure that way you have extra to spend on other things you’d like to decorate with.

Chinoiserie Pumpkins DIY Supply List:
- Small plastic pumpkins. I purchased THESE because Amazon is always a good idea.
- Chinoiserie paper napkins and THESE are some of what I used in this project.
- White school glue or Mod Podge if you prefer.
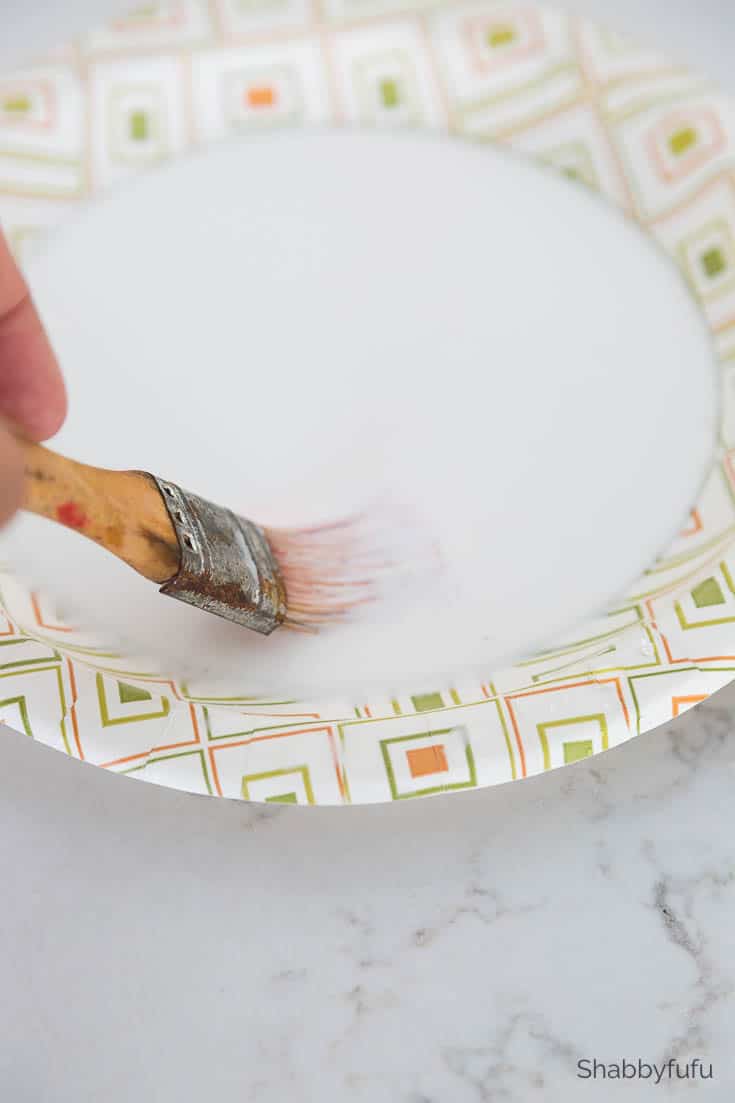
- Coated paper plate or small plastic container.
- Paint brush…I like to use a synthetic 1 12/2″ bristle brush, but you could use foam.
- Gloss spray sealer (optional) and I like THIS ONE.
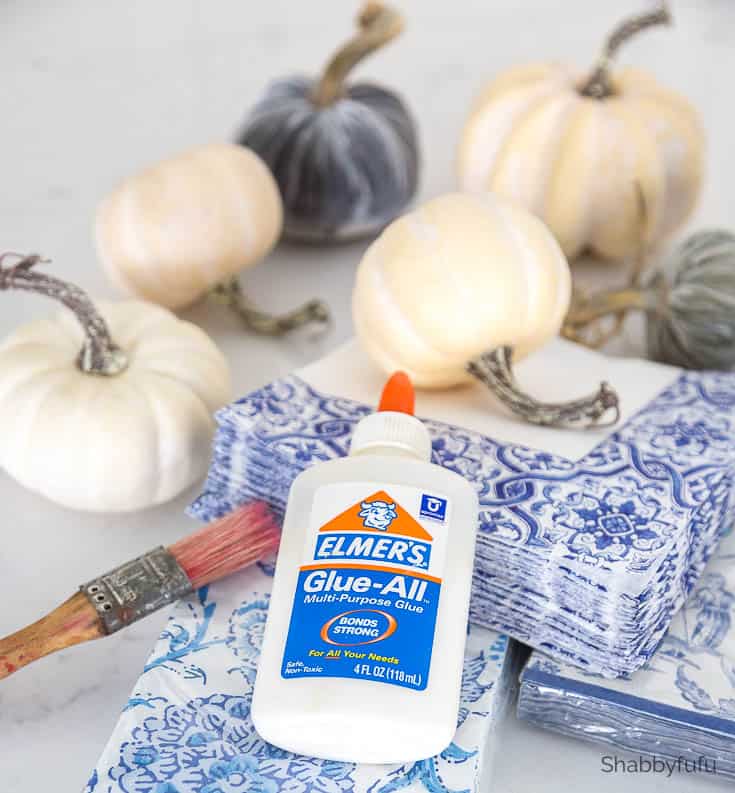
So as you can see, nothing fancy required other than the blue and white paper party napkins. I had two packs of blue and white toile napkins left from THE WEDDING RECEPTION that I mixed in for variety.
Start by separating a few Chinoiserie paper napkins (or blue toile paper napkins) if they are 2 ply or 3 ply. It’s just easier to work with the paper being thinner. The paper will be thin, but it won’t matter if you accidentally tear some since these will be decoupaged pumpkins.
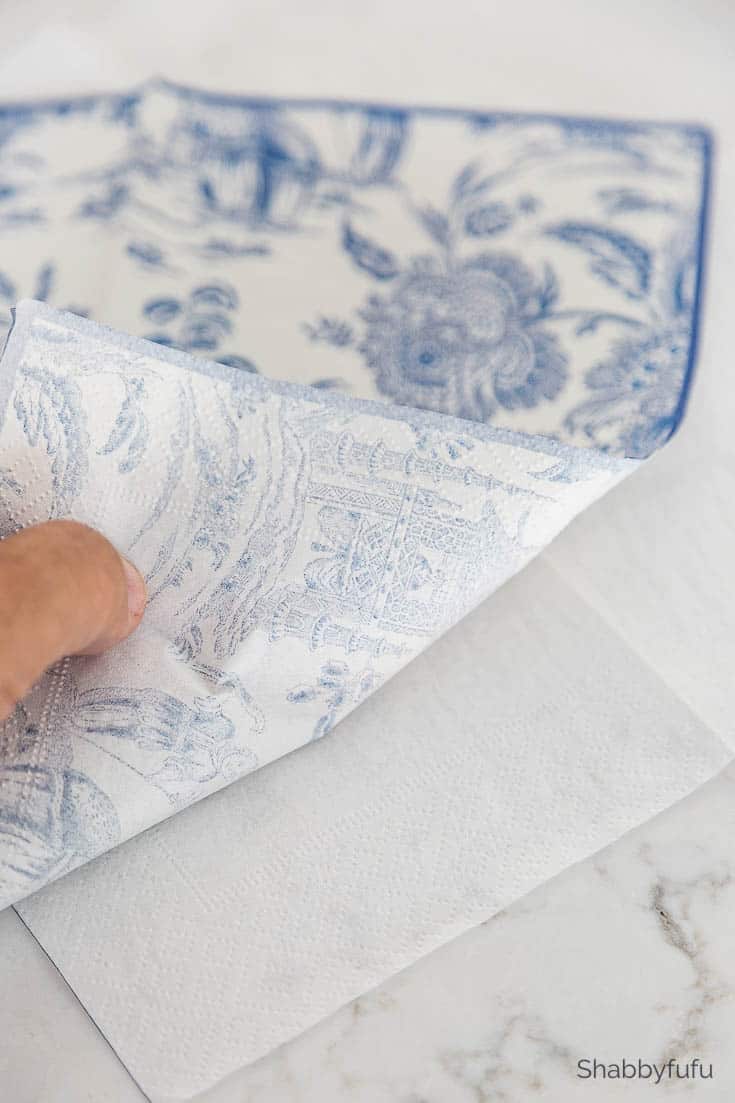
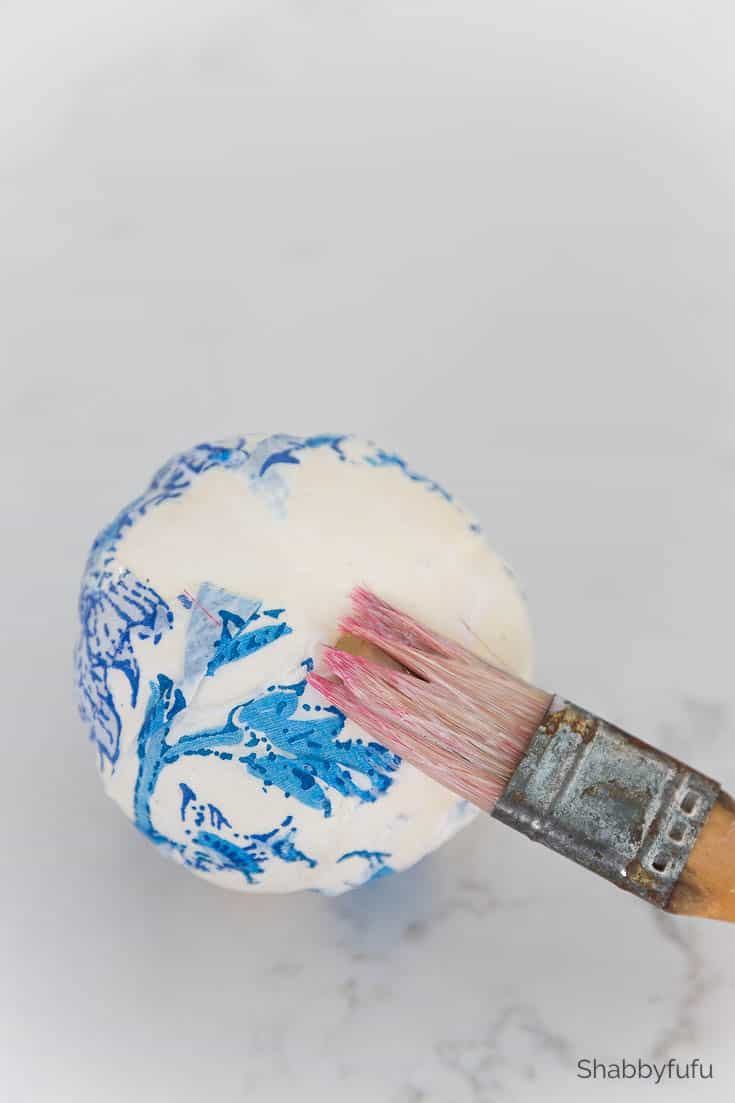
Next mix your glue or Mod Podge with some water about 50/50. The mixture should be thin since the paper is.
Application techniques for chinoiserie pumpkin diy
There are a couple of different ways to apply your tissue paper and one is to cut a hole where the pumpkin stem is. It doesn’t have to be exact….it’s decoupage after all!
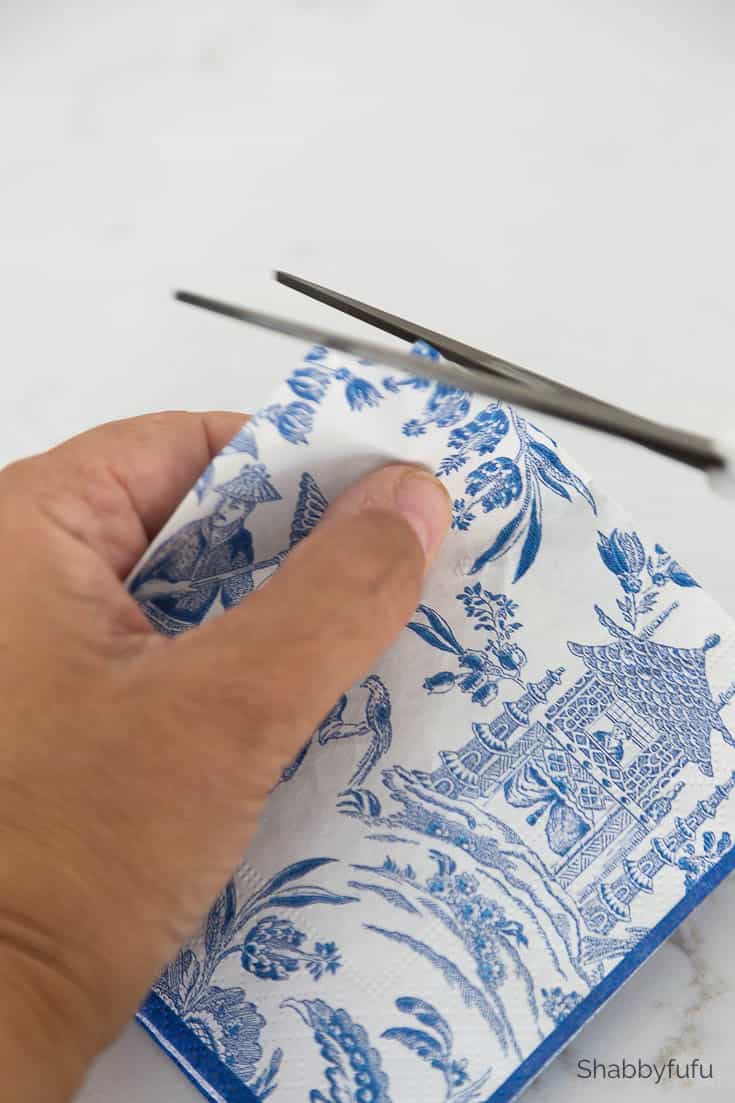
Lay the tissue (aka – one layer of a napkin) over the pumpkin just to see how it will fit. I like to cover the plastic pumpkin all the way around so that there are options in the display of turning on the side. You’ll perhaps have to use several pieces of tissue depending on the sizes of both the pumpkins and the the blue and white paper napkins.
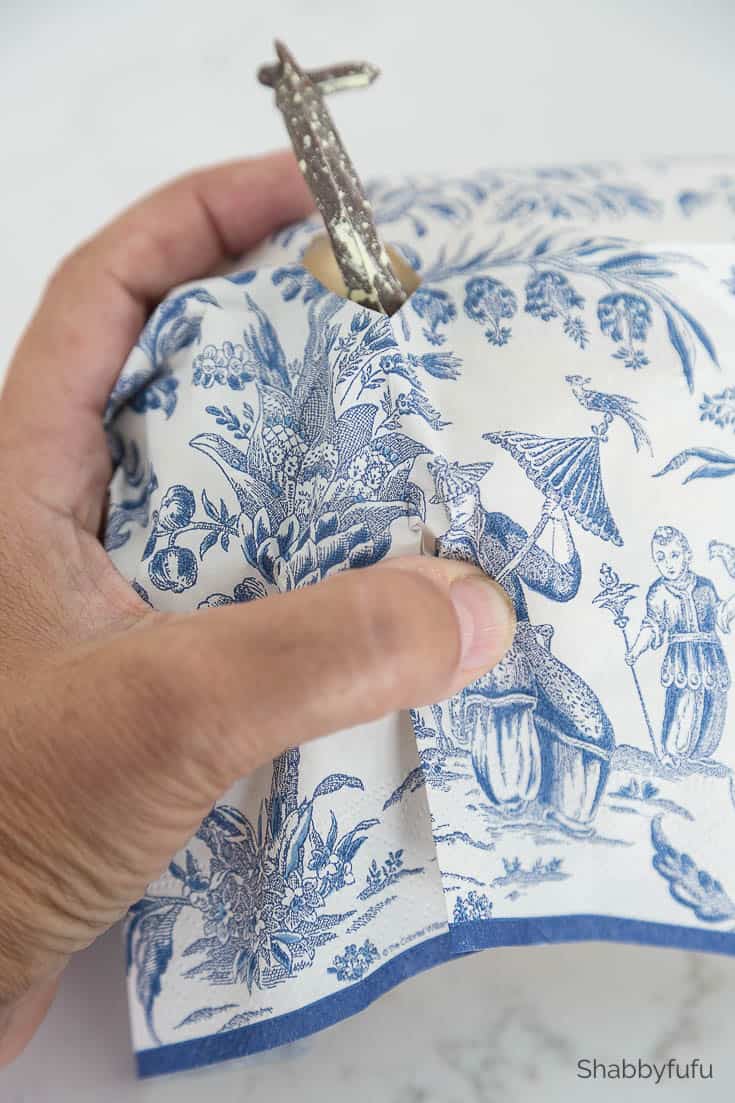
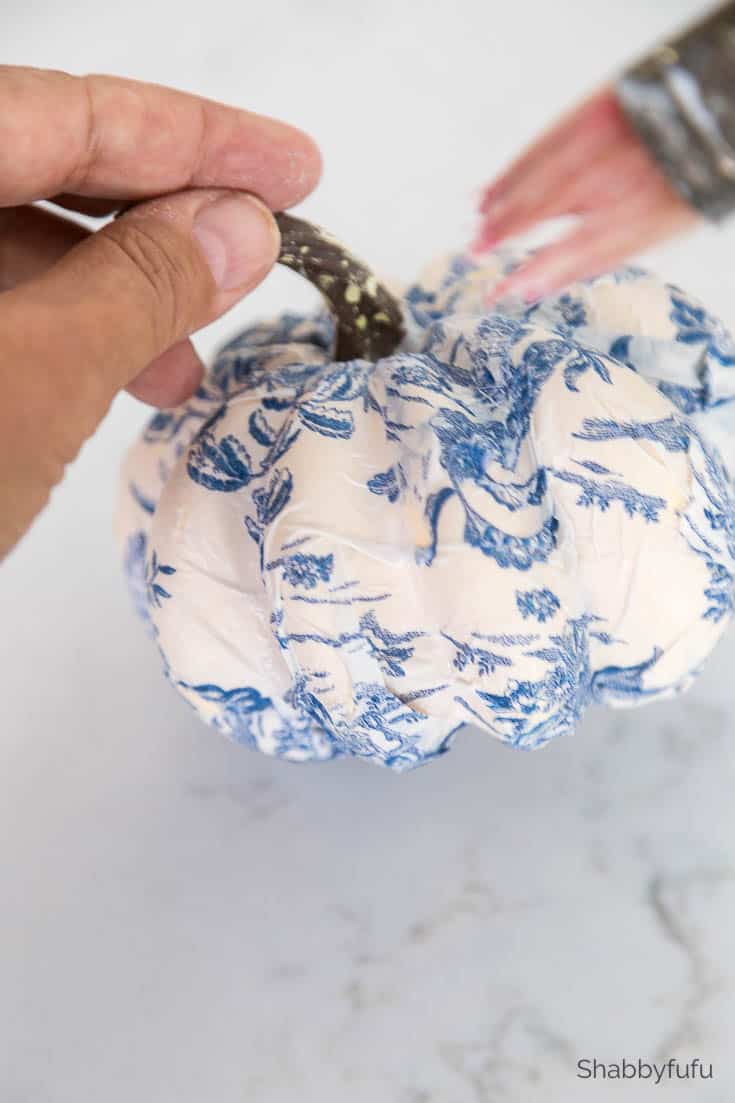
Take the paper off and while holding your pumpkin by the stem, give the pumpkin a light coat of the glue mixture all over. Then adhere the paper to the pumpkin by simply pressing down lightly with your fingers. Be gentle with the paper and if it tears, don’t worry as you can fill it in with a snippet of paper later.
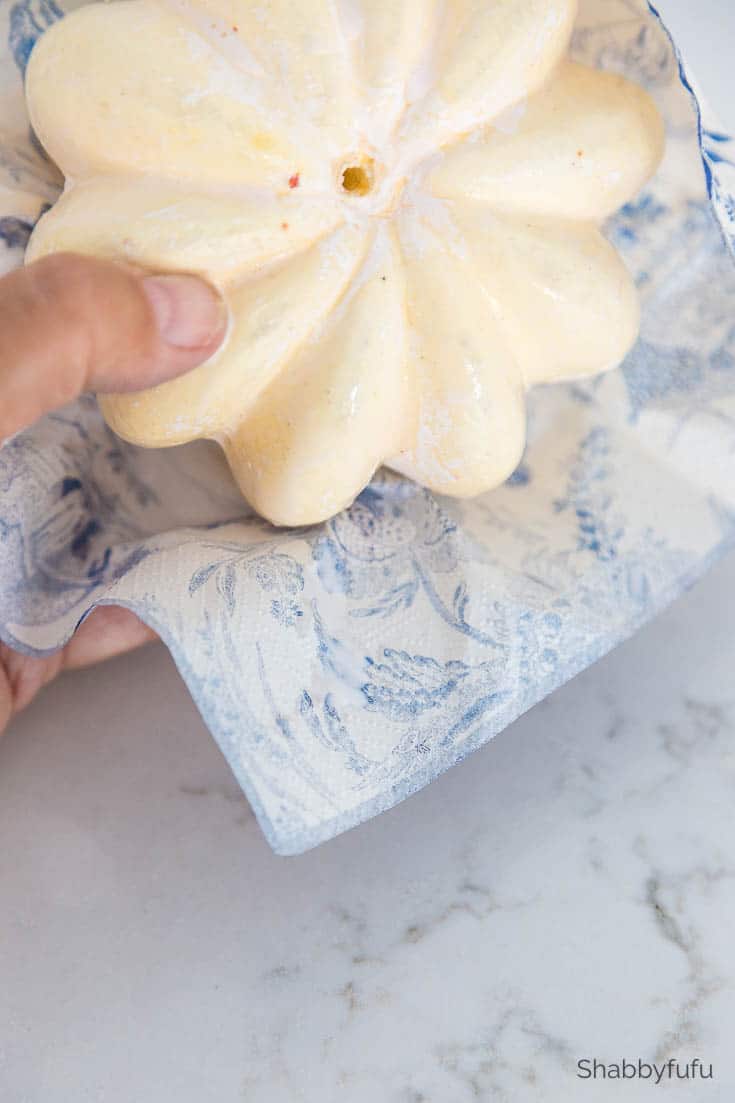
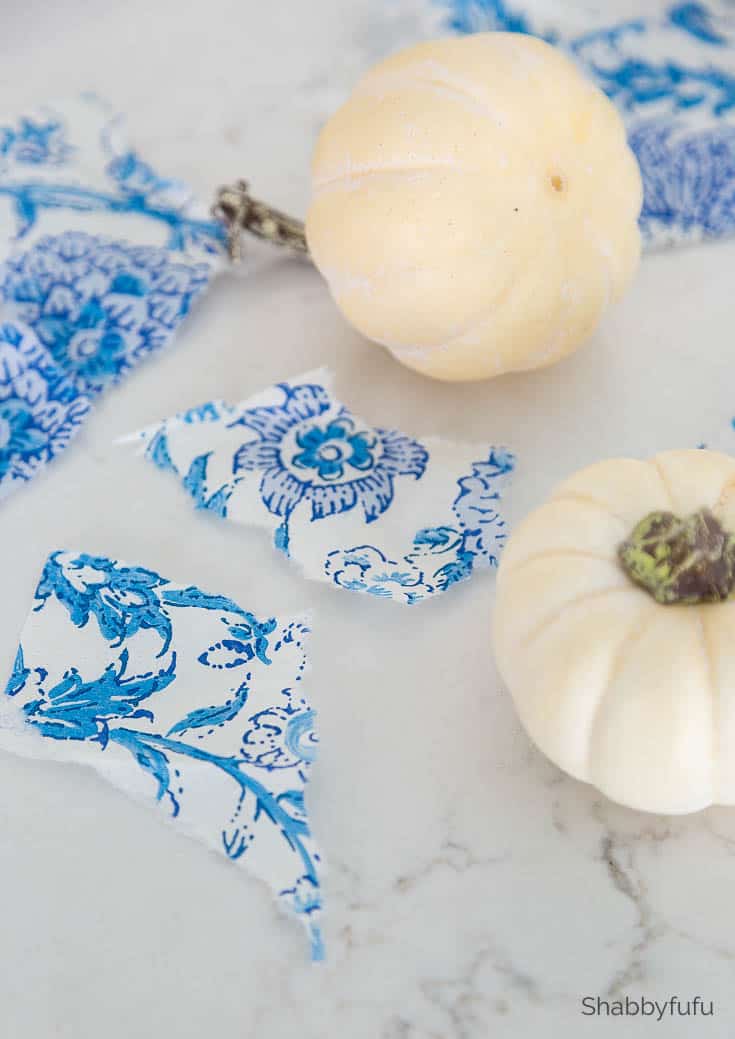
Once you’ve covered the pumpkin allow to dry and then tear off some pieces of paper if you need to fill anything in. You can also just tear off pieces and glue them on randomly as the small pieces shown for another pumpkin below. Get creative and if you have several patterns of blue and white paper dinner or cocktail napkins…mix them up!
Some of you have asked where I get the stems. They come as part of the white crafting pumpkins and look somewhat realistic! You can often pop them out of the pumpkin to craft with them, but I find it better to leave them on for something to grab onto.
You can see it’s going to look lumpy, but should smooth out some when drying. Once it’s starting to set up you’ll be able to smooth it out and once it’s sprayed with the sealer it will help too.
These blue and white decoupage pumpkins are going to be the life of the party! I have them mixed in with some blue and grey velvet pumpkins below and everyone loved this look.
PIN THIS POST FOR INSPIRATION
This post has been updated in August 2020
I am just loving your Fall and Pumpkin Decor Ideas!!! Thank you Janet for sharing!!!
Playing catch up here this morning Nancy and I wanted to thank you for stopping by my friend! xo
WOW awesome and thank you for inviting us
the link to the giveaway doesn’t take you anywhere…. where is the giveaway?
It’s fixed now Linda…it’s located in the post right before from yesterday 😉
what a lovely pumpkin idea – I can’t believe autumn is coming up on us now! These sound like such a cute make and pretty easy too! I might just have to give it a try!
These are so lovely. I might have to make a few with my daughter. These would be pretty to have around the house.
I haven’t done mode podge in years. These pumpkins seriously turned out so pretty. Just might have to break out the stuff and start making some of these for my own home.
Janet, these are sooo pretty. may have to give it a try this fall season.
Trying to catch up here and wanted to thank you Laura for stopping by. Fun project to do with the kiddos!
Love your fall decor! This is such clever idea. I love the way your pumpkins turned out.
I think I will pick up some Pumpkins this week and get my son to help me decorate them so we can bring them to my mom and my daughters graves to remind them we was thinking of them for the Holidays.
This is a beautiful idea. I love decoupage I’m totally going to try this in the fall!
Oh I LOVE these, Janet! My whole house is full of blue and I can never find blue pumpkins that I like – these would be perfect! Such a fun and easy idea!!
Thanks Jenna…it’s super easy, so give it a try!
Love this project and right up my not so creative alley! I will definitely be doing this in September!
Can we be neighbors?! Love the pumpkins! Great idea for a girls’ party. Ordering napkins today. And I told myself no more purchases of autumn decor. Ha! Can’t resist these…
Oh my gosh this is so easy to do! I definitely am going to do this. I love how easy made this for me to do. I am not the most talented when it comes to crafts in something like this would be perfect for me! You are so creative!
This is such a cute project and with fall quickly approaching we have to get ready. I loved the way they came out and a great craft for when the weather gets cooler.
Such a great idea Janet. I love your sweet chinoiserie pumpkins. Happy Tuesday.
xoxo
Kris
Kris, thank you so much…glad you like the idea! xoxo
Beautiful decoupaged pumpkins. LOVE those napkins.
Thanks so much Danielle…Happy Sept!
I love how these turned out and how easy it would be to customize for our decor. Looks like we have a fall project.
Janet, this project is just genius! I love the blue pumpkins and they are just striking on your gorgeous fall table!
Thank you Ashley…so fun and you could try this in any color! xo
These are absolutely stunning! I never would have thought to use a napkin, so beautiful!
Thanks for stopping by Kristin and when I saw these napkins I just knew! xo
These are so pretty. I would never think to try to make them myself. I am so not crafty.
Love these !
Thanks Lucy! xoxo
I love the blue and the different patterns. Fun project!
Thanks Jennifer…it was fun and something easy for anyone to try!
Brilliant Janet!! I love the blue and white print and how you displayed them in your gorgeous tablescape! Happy Fall friend!
Thank you Heather…happy September to you! xo
I never knew what that pumpkin was called, this is a super easy tutorial to use for chinoiserie pumpkins. They came out really beautiful!
These pumpkins came out gorgeous and are the exact type of fall decor I love inside my house. So elegant and delicate. I am going to try making these!
These turned out so cute. I love the look of these chinoiserie pumpkins!
Oh my goodness, Janet! These are to darn cute and so so simple to make! Your vignettes always look to effortless and beautiful!
Thanks Norma for stopping by and they were such fun! Hope all is well my friend…xoxo
What pretty pumpkins! I love how you mixed them with the velvet pumpkin too! Really elevates the table!
Thanks Leslie…it was a fun thing to do!
Oh wow! This looks so creative. It’s like the most beautiful pumpkin I ever saw. These would serve as great conversation pieces to place on the living room table.
I’ve never heard of Chinoiserie Pumpkins before. They are so pretty! What a great craft.
You had me at pumpkin! Seriously though, these are gorgeous. I love The blue and white ginger jar look.
You did a great job decorating those pumpkins. I really like that someone doing this craft could change it up to suit a holiday, season or their own decor.
Such an easy and beautiful DIY! I will definitely have to try this one. I actually have decoupaged a pumpkin but I would love to do chinoiserie! Awesome!
Such a fun and simple project to do! xo
Wow, this is such a nice idea. Now I learn something about making this kind of do-it-yourself. Will try making this with my friends too.
Oh my goodness, Janet! These are just precious! I’ve gotta try this! xoxo
Thanks Summer…you can do this with any color napkin and I am pretty sure I know color you’d pick, LOL
These are absolutely gorgeous, Janet! I LOVE the blue Chinoiserie. I am going to be on the lookout for some napkins like that… so glad you could be part of this hop!
Thank you Krista for hosting..such a great group to be a part of 😉
Dear Madam,
Is there any way to preserve the pumpkin first to make it last before dappling on the beautiful pattern? Just curious about it.
Thank you for reading.
Affectionately,
Confectionery
The pumpkins are fake (faux) so you don’t need to preserve them first 😉
What a fun idea! I might have the girls make these for Thanksgiving this year!
Definitely one that anyone of any age can do and so fun!
Chinoiserie napkins? Who knew?? I love the idea of using napkins to create these. So pretty, Janet!
Thanks so much Jennifer…this was such a fun and easy project to do!
Napkins! Who knew! Brilliant as ever Janet!
Just the way that this ol’ brain works Cami, LOL. Love all your projects too my friend.
Such a beautiful idea, Janet! I never ever would have thought to use napkins, but I see so many pretty designs all the time. Love it!
Thanks Lauren…definitely napkins around to go with any colorway!
Those are gorgeous. I may have to try some in pink (unless I win some velvet ones!)
I love these pumpkins, too. I may have to make some in pink if I don’t win any velvet ones!
Good luck! I have a discount code and these pumpkins are truly the best out there!
FUN project… I send a pic when completed. ?Linda of no.cal.
Sounds great Linda…a super easy project too!
I just love everything about these, and you make them look so easy! XO
Christy, thanks so much and they truly were so simple to make! Fun partying with you….xo
Wow, Janet! These turned out so pretty — I love your creativity!
Thanks Laura…such a fun project! xo
I love Chinoiserie style, and the pumpkins came out amazing! Such a clever DIY to use the napkins. Pinning for later.
Thank you Linda…it’s such a simple way to add character!
This is perfect! I love blue and white decor! Everywhere you turn in my house, you’ll find some. The last few years I have been decoupaging various things for the holidays with my Dad’s old sheet music. I have several pumpkins decoupage with the sheet music. I’m going to follow your instructions and make some blue and white ones to add to my fall decor. Thanks so much for the inspiration.
Kathi…I love old sheet music and book pages used in decor too! So happy that you are going to try this project.
Oh Janet I love these! I also found the most gorgeous deep blue velvet on a pillow at a thrift store. It will become pumpkins!! So excited. I get inspiration from every one of your post!
Lynn…I smiled from ear to ear to hear you mention the inspiration. Thank you so much and lots more coming your way! xo
I love this! Do you prefer the look of matte or gloss mod podge for these pumpkins?
Hi Lyn, I prefer the gloss which gives it almost a glassy look. Good luck with your project!
Janet,
This is brilliant!
I just purchased a bucket full of plastic pumpkins and love decoupaging them!
I have to try this!
Hugs,
Robin
I’m so glad that you like this project Robin…let me know if you make it!!
These are so pretty! Easy enough even I could do! 🙂 Thank you for such a great post, links, and pictures of the process Janet.. I am going to pass along this info. to some friends who I know would love to make some also!
Happy Fall! XO
Aren’t they fun Ashley? Just a jumping off point to inspire! xo
Did you make the stems???
Hi Susan. No, they came this way.
The pumpkins are absolutely marvelous …..where did you get the great stems?
They are part of the pumpkin…as purchased!
Beautiful project Janet, you created a beautiful display with your table.
I’ve never cared for the color orange, so needless to say I’m not much for decorating with orange pumpkins. However, I will love using these decoupage pumpkins. They autiful!
I don’t decorate with orange either Sally, and I’m so happy to hear that you’ll be making some Chinoiserie pumpkins!
I love this idea. My decor is mostly blue and white and orange does not always work with it. Thank you, thank you. I will be looking for B & W napkins. I can’t wait to start.
Oh how I love this idea! Woo hoo! I love everything about Fall.
These are so cute! I have a ton of little white pumpkins. Now I’ll have to get some pretty napkins and fancy them up! Thanks for sharing another great idea!
I haven’t decoupaged pumpkins yet but I have had a great time doing Easter eggs. Gotta be on the lookout for some Chinoiserie or toile napkins; our local Christmas Tree Shop always has great napkins!
Kathy…the best way to decoupage is with paper napkins like I have linked in the post! Happy weekend!
These pumpkins are so cute! Loved the way they turned out.
Thanks DaleAnn, hope you try making some yourself!
You can smooth out the napkin while it’s still wet by wadding up some Seran wrap (any brand works) & gently burnishing the surface of your project. This is also a great way to smooth out any air bubbles.